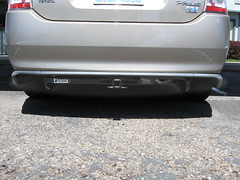
Trailer hitch on a Toyota Prius (2nd generation)
 This week I bought and installed a Curt 1 1/4” trailer hitch on my 2009 Toyota Prius. U-Haul sells them for $135, model 24743 (which covers all Gen 2 Priuses, 2004-2009). It is a Class I hitch, which allows for 2000 lbs towing weight or 200 lbs tongue weight (that is, the downward force upon the hitch, when a bike rack is installed for example). Officially Toyota does not recommend any sort of towing with the Prius, but unofficially you should be able to tow up to the Class I limit of 2000 lbs without a problem. However, the main reason I installed one was for a bike rack.
Installation was pretty easy; I did it myself on the ground in about an hour. However, 2 people and a lifted vehicle would have been much easier. There is no drilling required; all you need is a ratchet wrench set (I didn’t write down the sockets I used, but they’re all in my $20 Lowe’s socket set), a narrow thin flat-head screwdriver, a utility knife and a flashlight.
On a stock Gen 2 Prius, there are two towing loops under the car, one on each side of the back of the car. These are useful for securing a hanging bike rack, keeping the back hatch down when hauling long objects, etc. Installation involves removing the tow loops, and bolting the hitch to the frame attachment points that the tow loops used. Once the hitch is installed, you still have tie-down loops available, since there are loops welded to the sides of the front of the hitch, so nothing is lost in the process. (I don’t think they could be used for strap towing though, just as tie-down loops.)
Once the hitch is installed, it lines up flush with the back bumper, and does not reduce vertical clearance (the bottom of the hitch is the same as the side skirt). The only permanent modification needed is a slit that needs to be cut in the under skirt to accommodate the driver side of the hitch. This under skirt is removed during the installation procedure, is not visible from the sides or back of the car, and is a secondary protection (that is, the car would be fine without it installed at all), so cutting an extra hole is fine. The plastic on the under skirt is very thin and can easily be cut by a utility knife or stout scissors.
One thing to look out for: look at the right side of the hitch in the photo, and notice how the main tube bar does not go all the way across. It is welded to a secondary cross bar which itself covers about 3/4 of the hitch, so it’s fairly solid. The reason this is done is because if the tube bar went all the way across, it would deflect the airflow of the tailpipe exhaust, and begin to deform the bumper. This was apparently changed by Curt around 2007 to the current design, so be careful if you find a hitch with the tube bar all the way across, and don’t use it (or reroute the tailpipe if you have to use it).
I’ve also ordered a trailer light kit for the car, T-One part 118505. Again, I don’t plan on towing a trailer, but it would be nice to have the required lighting if I do need to some day. Don’t try to build your own or use a generic kit, since the Prius (as well as many modern cars) don’t put out much energy to the rear lights, so tapping into them may overload the circuit and blow the car fuses. Car-specific 4-flat light kits include a built-in overload protection module.
More reading:
- Installation PDF (Model number is the previous model 11468, but the installation instructions are the same)
- Video installation guide on YouTube, from eTrailer
- Hitch installation from EVnut.com, also explains the melting bumper problem from the previous model
- Another installation guide from eHow
- T-One 118505 4-flat light kit
- Trailer light installation instructions from EVnut.com (Instructions document modifying a 118308 wiring kit from a Camry. This is no longer needed since the Prius-specific 118505 came out, but the installation and routing instructions are still useful.)